
Step by step how to install windows 11 from usb
Imagine breathing new life into your PC in just under an hour, giving it that “fresh out of the box” speed and performance. Whether you are building a new gaming rig or rescuing a sluggish laptop, knowing how to install Windows 11 from USB is the single most valuable skill you can have in your digital arsenal today.
In this guide, I will walk you through the exact process I’ve used for over two decades to set up thousands of reliable machines.
This isn’t just about clicking “Next”—it’s about empowering yourself to take total control of your hardware without paying a technician a dime.
We will cover everything from prepping your drive to that satisfying moment when the new Windows desktop loads for the first time. By the end of this article, you will feel the confidence that comes with mastering your own technology.
Let’s be honest: the idea of wiping your computer can feel daunting, but I promise the process is safer and easier than you think. You are not just installing software; you are resetting your digital workspace for maximum productivity and peace of mind.
Grab your flash drive, take a deep breath, and let’s dive into the definitive method to get your PC running smoother than ever.
Creating the Installation Flash Drive for Windows 11/10
Before we touch the BIOS or start the installation, we need to build our primary tool: the bootable media. Think of this flash drive as your master key—it contains the entire operating system and the instructions your computer needs to install it from scratch.
This process works identically whether you are setting up Windows 10 or the newer Windows 11, giving you flexibility depending on your hardware’s capabilities.
Creating this drive is a straightforward process, but it requires precision to ensure the files are not corrupted during the download. You are essentially turning a simple storage stick into a powerful repair and installation wizard.
Don’t worry about complex coding; Microsoft has automated 90% of this work, and I will guide you through the remaining 10% to ensure flawless execution.
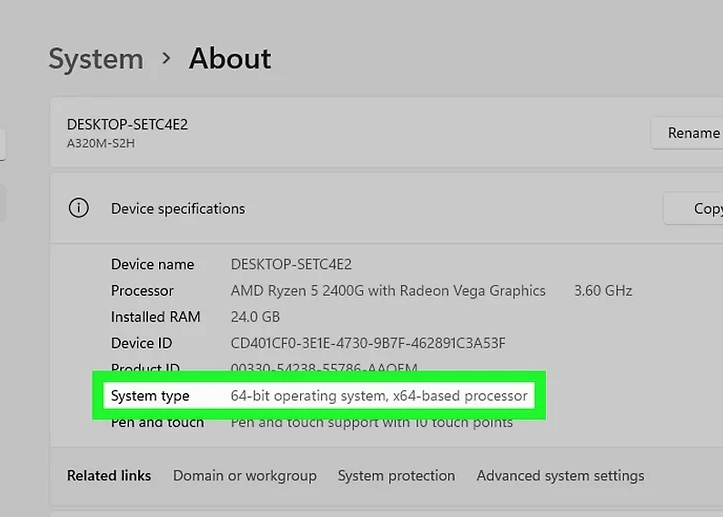
Check the computer’s architecture.
Before downloading anything, you must confirm that your processor can handle the 64-bit version of Windows 11, as the 32-bit version is a thing of the past for this OS. Installing the wrong version is a rookie mistake that will waste your time and bandwidth, so let’s get this right immediately.
How to do it:
- Click on the Start button and select the Settings gear icon (or press Windows + I).
- Navigate to System and then scroll down to click on About at the bottom of the list.
- Look under the “Device specifications” section for “System type.”You need to see “64-bit operating system, x64-based processor” to proceed with Windows 11.
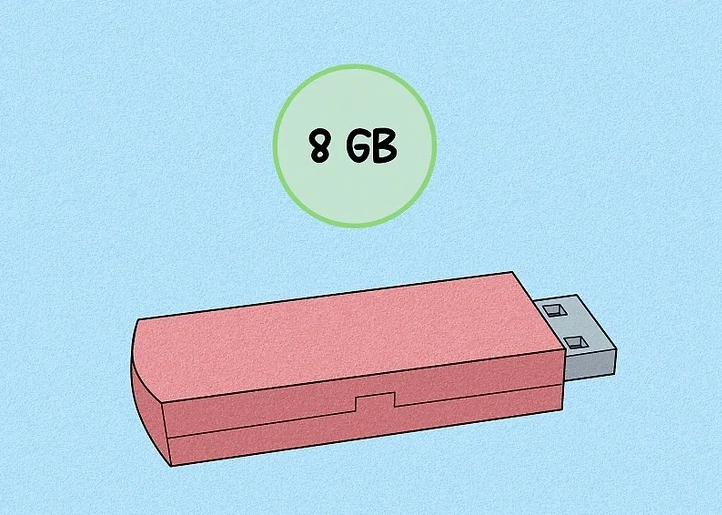
Make sure that you have at least an 8-gigabyte flash drive.
Windows 11 is a robust operating system, and its installation files have grown significantly over the years. Using a drive smaller than 8GB will result in the Media Creation Tool failing halfway through the process, causing frustration and lost time. I always recommend using a USB 3.0 drive if possible, as it significantly speeds up the copying process.
How to do it:
- Plug your USB drive into your computer and open File Explorer.
- Right-click on your USB drive icon and select Properties from the context menu.
- Check the “Capacity” field; if it reads anything less than 7.8 GB (actual usable space for an 8GB drive), you need to swap it for a larger drive, ideally 16GB or 32GB, to be safe.
Plug the flash drive into your computer.
This sounds simple, but port selection matters more than most people realize for stability during data transfer. Avoid using USB hubs or extension cables, as these can introduce connection drops that corrupt the installer files without you noticing until it’s too late.
How to do it:
- Locate a USB port directly on your motherboard (usually the back of a desktop PC) or a main port on your laptop chassis.
- Insert the drive firmly and wait for the Windows notification sound to confirm it is connected.
- Open This PC to verify the drive has appeared and note down its drive letter (like D: or E:) so you don’t accidentally format the wrong disk later.

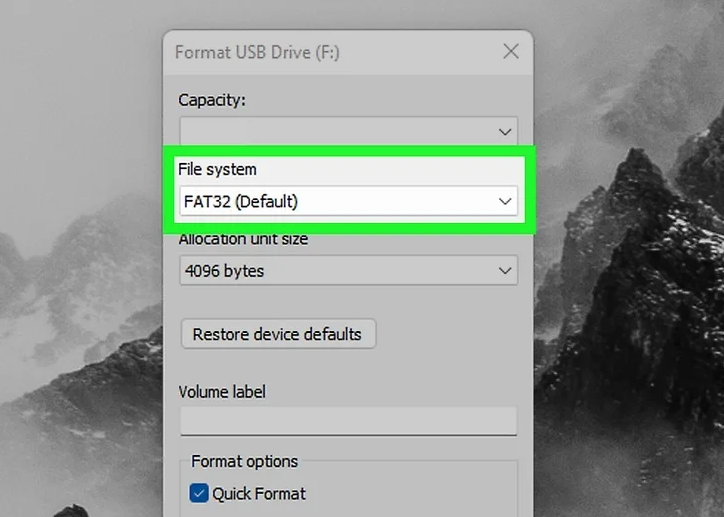
Format the flash drive to FAT32 or exFAT.
While the installation tool will eventually format the drive for you, manually formatting it first is a “mental safety check” I always perform. It clears potential hidden partitions or corruption that could confuse the automated tool. For a UEFI boot (standard for Windows 11), FAT32 is the native language your motherboard speaks.
How to do it:
- Open File Explorer, right-click on your USB drive, and select Format….
- In the “File system” dropdown menu, select FAT32 (preferred for compatibility) or exFAT (if you plan to use the drive for large files later).
- Leave “Allocation unit size” as default, check the Quick Format box, and click Start. Click OK on the warning popup to wipe the drive clean.
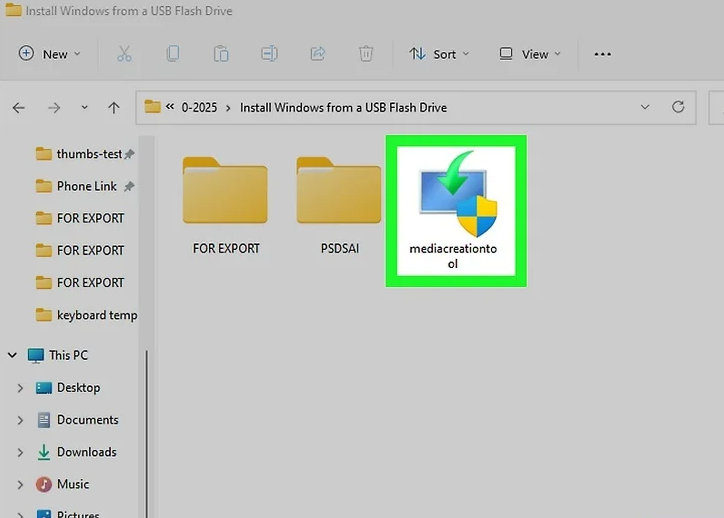
Download the Windows installation tool.
Now we need to get the official “Media Creation Tool” directly from the source. This small piece of software is the bridge that downloads the massive Windows image and safely writes it to your USB. Never download Windows ISOs from third-party torrent sites; they often contain malware that compromises your system from day one.
How to do it:
- Open your web browser and search for “Download Windows 11” or go directly to the official Microsoft software download page.
- Scroll down until you see the section titled “Create Windows 11 Installation Media.”
- Click the blue Download Now button to save the mediacreationtool.exe file to your Downloads folder.

Run the installation tool.
This is where the magic begins. You are initiating the program that will configure your USB drive specifically to boot up a computer.It requires administrative privileges because it needs low-level access to your drive to make it bootable—a critical step in learning how to install Windows 11 from USB.
How to do it:
- Navigate to your download folder and double-click the MediaCreationToolW11.exe file.
- When the User Account Control (UAC) window pops up asking for permission, click Yes.
- Read the Microsoft Software License Terms (or skim them like we all do) and click Accept to proceed to the setup phase.
Create your bootable flash drive.
You are now at the command center of the operation. The tool will ask you a few questions to customize the Windows version.This is the pivotal moment where you tell the software to ignore your current PC’s settings and instead build a universal installer for your USB.
How to do it:
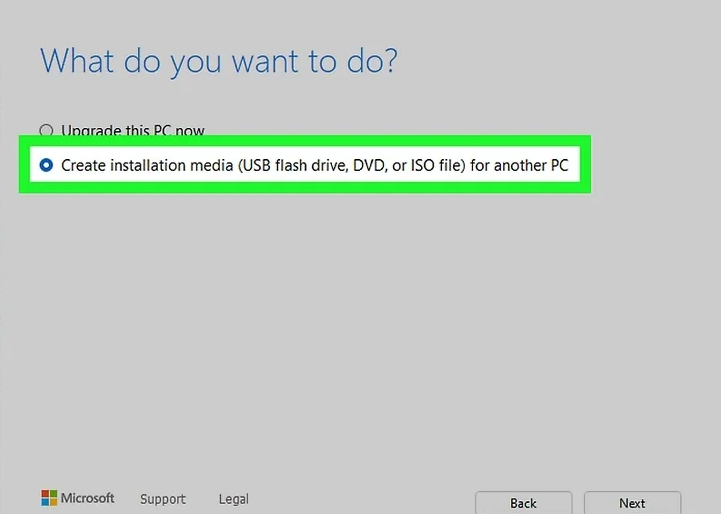
- Uncheck “Use the recommended options for this PC” if you plan to use this USB on a different computer; otherwise, keep it checked and click Next.
- On the “Choose which media to use” screen, select USB flash drive (not ISO file) and click Next.
- Select your USB drive from the list (double-check the drive letter!) and click Next one final time to start the creation process.
Wait for the flash drive setup to complete.
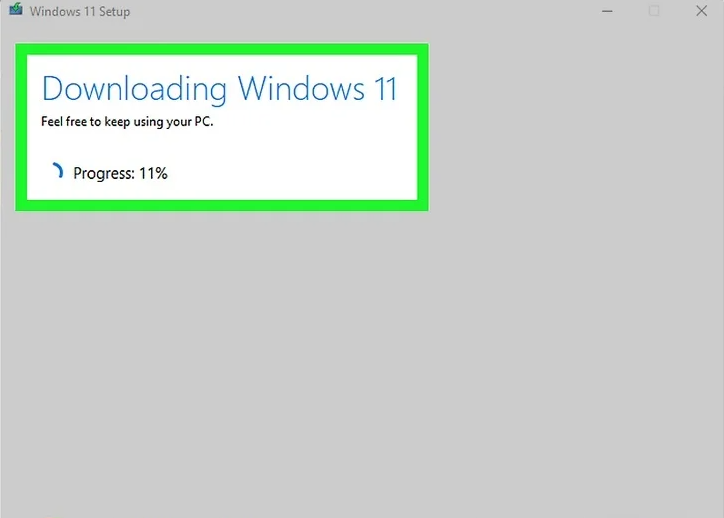
Patience is key here. The tool is downloading over 5GB of data and then verifying every single bit to ensure there are no errors. Depending on your internet speed, this could take anywhere from 10 to 45 minutes. Use this time to back up any data on the target computer, because once we start installing, there is no going back.
How to do it:
- Watch the “Progress” percentage counter; do not remove the drive or put the computer to sleep during this time.
- Once the download finishes, the tool will automatically switch to “Creating Windows 11 media”—let it run until it reaches 100%.
- When you see the message “Your USB flash drive is ready,” click Finish, wait for the cleanup process to close the window, and safely eject your drive.
Conclusion
Congratulations! You are now holding a powerful key capable of unlocking a fresh, ultra-fast operating system on almost any modern computer. You have mastered the technical preparation, which is often the hardest part of the journey.
The next time your computer slows down or acts glitchy, you won’t feel that sinking feeling of panic. Instead, you’ll simply reach for this drive, knowing you have the power to fix it yourself.
Installing Windows 11 from this USB is more than just a technical update; it is a commitment to a better, more efficient digital life. You have saved money, gained a new skill, and taken ownership of your technology.
So go ahead—plug that drive in, reboot your system, and enjoy the lightning-fast performance of a clean Windows installation. You earned it.
Frequently Asked Questions
After helping thousands of users through this process, I know that even with a perfect boot drive, the actual “booting” part is where the anxiety kicks in. The black screen with white text can be intimidating. Here are the answers to the most common questions I receive, ensuring you don’t get stuck at the finish line.
Can I boot from a USB without accessing the BIOS?
Yes, absolutely. You don’t always need to dive into the scary blue BIOS screens to change the boot order permanently. Most modern computers have a “One-Time Boot Menu.” You simply tap a specific key (often F12, F11, or Esc) immediately after turning on the PC, and a list appears letting you select your USB drive just for that session.
Pro Tip: If you are already inside Windows, hold the Shift key while clicking Restart. This takes you to the “Advanced Startup” menu where you can select “Use a device” and boot from your USB without touching a single keyboard shortcut.
What is the F12 boot menu?
Think of the F12 boot menu as a “VIP entrance” for your operating system. Instead of the computer defaulting to its internal hard drive, pressing F12 (on brands like Dell, Lenovo, and Acer) halts the startup sequence and presents a menu.
Here, you can manually tell the computer, “Ignore the hard drive today; I want to start from this USB stick.” It is the safest way to install Windows because it doesn’t alter your permanent BIOS settings.
Is it possible to install Windows from an ISO file on a USB drive?
Yes, and many power users prefer this method. An ISO file is essentially a digital clone of a DVD. While the Media Creation Tool does everything automatically, you can download the Windows 11 ISO separately and use a third-party tool like Rufus to “burn” it onto your USB.
This is particularly useful if you need to create a drive that bypasses certain hardware requirements (like TPM 2.0 checks) or if you are setting up the USB on a non-Windows machine (like a Mac or Linux PC).
What does the F2 key do when starting the system?
On the vast majority of computers (Asus, Dell, Acer, Samsung), pressing F2 repeatedly during startup opens the BIOS/UEFI Setup Utility. Unlike the boot menu, this is the “engine room” of your computer.
Here, you can change the system time, enable virtualization, control fan speeds, and permanently change the boot order. If your USB isn’t showing up, the F2 menu is usually where you go to disable “Secure Boot” or enable “USB Boot.”
Is the F12 key the BIOS key?
Technically, no. While it interacts with the BIOS, F12 is typically designated as the Boot Menu key, not the Setup key.
- F12 = “Let me choose which drive to start from right now.”
- F2 or Del = “Let me enter the settings menu to configure the hardware.”
Think of F12 as a guest pass and F2/Del as the master key to the building.
What is the difference between F11 and F12?
Functionally, they often do the exact same thing—open the Boot Menu—but they are assigned by different manufacturers.
- F12 is the standard for Dell, Lenovo, Toshiba, and Acer.
- F11 is commonly used by HP, MSI, and ASRock motherboards.
There is no difference in what the menu does; it is simply a matter of which brand branding sits on your desk. When in doubt, I usually tap F11 and F12 rapidly; the computer will recognize the correct one.
What is UEFI boot?
UEFI (Unified Extensible Firmware Interface) is the modern, smarter successor to the old-school BIOS (Legacy). It’s the standard for Windows 11. UEFI allows for faster startup times, supports hard drives larger than 2TB, and provides better security features like Secure Boot, which prevents malware from hijacking your boot process.
When creating your USB or changing settings, always ensure you are selecting “UEFI” options rather than “Legacy” or “CSM” to ensure your Windows 11 installation is future-proof and fully compatible.

Sou Marisa Silva — Ao longo dos anos, desenvolvi um profundo interesse por temas que ajudam as pessoas a entender melhor a si mesmas e o mundo ao redor. O blog, que começou focado em interpretações de sonhos, hoje evoluiu para explorar uma variedade de assuntos — desde bem-estar, comportamento e desenvolvimento pessoal até temas do cotidiano que despertam dúvidas e interesse.